Showing posts with label miscellaneous. Show all posts

Wednesday, May 2, 2012

Tofu Cacciatore


I'm going to be honest here, I've never been a big fan of Chicken Cacciatore. Maybe it's because it's just not a food that I grew up on, or maybe it's because peppers are not on my list of favorite vegetables. I don't know, but when my friends Chris-Anna and Jill suggested to me that a vegan cacciatore would be something that they could get into, I felt I was up for the challenge.

Read more �

Friday, December 16, 2011

Links for Latkas

For all of us celebrating Hannukah, and even for those of us who just have a love of potato pancakes, the internet is buzzing right now with healtier/veganized recipes of latkas. I thought I would provide you with a few links to get you started, in case you were wondering what the heck you were going to do this year while your family was chowing down on those greasy mofos.

And speaking of those greasy potato pancakes, I've got a sad story to tell you. Chris-anna, my friend, business partner and frequent contributor to HGK, decided to partake in 3 of said greasy mofos last year at a Hannukah party after having eaten mostly no-oil, vegan, nutritarian food for over a year. And this is a chick who loves her french fries.

Within 15 minutes she was laid up in her bed for the rest of the day with what we now affectionately call "the latka induced migraine."

Don't go there folks. Make these instead:

Carrot Parsnip Pancakes

Melody Pakow's Healthy Latkas

Ann Parkin's No-oil Latkas

The Shannon's Baked Latkas

Scallion Ginger Latkas

I know what you are thinking. The whole purpose of eating fried latkas on Hanukkah is to commemorate the miracle of the burning of the OIL in the temple for eight days. But you know what, I can celebrate in other ways, and I'll feel a whole lot better for it.

Traditional latkas are made with potatoes and onions, but I love a pancake made with any root vegetable and there are lots of creative combinations out there. Do you have another vegan, baked latka recipe to contribute to the list? Please leave any ideas in the comments section. Thanks!

For a complete listing of ideas for a vegan Hannukah menu, see this post from Marla Rose.

Wednesday, November 16, 2011

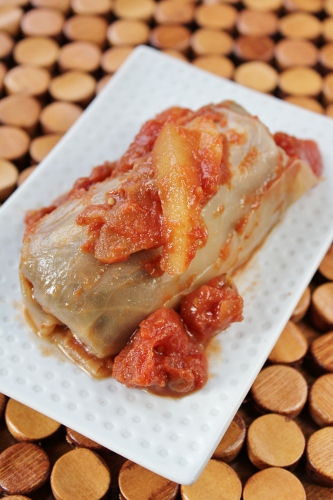
Vegan Sweet-n-Sour Superfood Stuffed Cabbage


Lately I've been obsessing about an old country favorite of mine-Stuffed Cabbage. If you've never had it before, it's quite a treat. Originally made with ground beef and white rice as the filling, I think you'll find that my no-oil, no-added-salt, Vegan superfood version doesn't leave anything to be desired.

Some people might consider the preparation of Stuffed Cabbage to be an ordeal. But if you grew up eating it (thanks Mom!) and absolutely miss it now that you are Plant-strong, you might just consider this recipe worth every minute of your time. I know I do.

Like a woman, stuffed cabbage gets even better with age. I served it to a group of friends for dinner on the night that I made it. It was very good. When I ate some leftovers three days later, it was markedly more delicious. I think I actually had a foodgasm.

HGK's Vegan Superfood Stuffed Cabbage

Printable Recipe

1 1/2 cups diced onion
2 cups diced zucchini (1 small zucchini)
5 cups diced mushrooms (16 ounce package, diced)
2 cups cooked whole grain like quinoa, bulgur or brown rice
2/3 cup currants
3/4 cup finely chopped walnuts
2 tsp dried basil
1 tsp dried oregano
1 tsp dried thyme
1/2 tsp pepper
1 large head green cabbage
1 recipe Sweet-n-Sour Tomato Sauce
1 apple, peeled and sliced thinly


Preheat oven to 425 degrees.

Prepare your whole grain if it is not yet cooked.

Prepare a batch of the Sweet-n-sour Tomato Sauce.

Boil a large soup pot full of water. Turn off until you are ready to prepare cabbage leaves.

Place a large saute pan over medium heat. Pour some vegetable broth into the pan to just cover the bottom. Once the broth is bubbling, add the diced onion and stir. Cook until the onion is translucent, stirring frequently. Add a touch more vegetable broth as needed to prevent burning.

Add the diced zucchini and stir. Let cook for three minutes. Add diced mushrooms and stir. Cook, stirring frequently, until zucchini and mushrooms are soft and liquid released from mushrooms evaporates.

Turn off heat. Add cooked grain, currants, walnuts, spices and 1/2 cup of the Sweet-n-sour Tomato Sauce. Stir gently to combine.

Cover the bottom of a 9x13" casserole dish with some of the Sweet-n-sour Tomato Sauce.

Bring the pot of water back to a boil. Carefully cut all the way around the core of the cabbage, as deep as you can go (about 3 inches deep). Carefully place entire head of cabbage into water. Let cabbage boil until the outermost layer is soft and is beginning to come away from the head. You may need to nudge it a little with a pair of tongs. When leaf comes away from the head, use the tongs to lift the leaf out of the water, letting the excess water drain back into the pot.

Keep the rest of the cabbage simmering as you roll each individual cabbage roll.

Lay leaf inside out in the middle of a dinner plate. Holding a paring knife (or other small knife) horizontally, carefully cut away the hard part of the stem. Place a heaping 1/3 cup of the filling onto the lower middle of the leaf. Fold the left and right sides of the leaf over the filling. Roll the cabbage all the way up from the bottom, pushing the left and right sides in if necessary. Place roll into casserole dish.

Repeat process until casserole dish is full of rolls or all of your filling has been used up.

Place apple slices evenly on top of cabbage rolls. Pour remaining Sweet-n-sour Tomato Sauce over rolls and distribute evenly. Bake, covered, at 425 degrees for 30 minutes. Turn heat to 250 degrees and bake for an additional 2 hours.
The stuffing-mushrooms, zucchini, onions, currants, walnuts and quinoa.

The individual cabbage leaf, turned inside out, before stuffing.

Apple slices over the top add to the magic.


Sweet-n-Sour Tomato Sauce

10 pitted Deglet (small) dates, soaked in water for at least 1 hour (less dates if you are using the larger Medjool variety)
vegetable broth for sauteing
1 cup diced onion
2 garlic cloves, pressed
2 14.5 ounce (or 1 28 ounce) cans diced tomatoes, unseasoned (not Italian style)
1 15 ounce can tomato sauce
juice of 1 large lemon
In a medium sauce pan, saute onion over medium heat in a few Tbsp of vegetable broth until translucent. Add garlic, stir and cook for an additional 3 minutes.
While onions are cooking, pour tomato sauce into the bowl of a food processor or high powered blender. Remove soaked dates from liquid and add to sauce. Blend until sauce is smooth.
Add diced tomatoes and tomato/date sauce to onions. Stir in lemon juice. Simmer on very low heat for ten minutes.

Here's a nice video demonstrating how to roll stuffed cabbage:


Do you prepare any special food that takes a long time but is oh-so-worth-it?

Friday, September 30, 2011

Chris-Anna's Show-Someone-You-Love-Them Vegetable Sugo

Think of this recipe as a killer substitute for meat bolognese, one of my husband's absolute favorite foods. Sugo is an Italian word meaning "juice" or "sauce." I love how it sounds . . . "sugo" . . . I could say it over and over.

My friend Chris-anna (who is also my business partner) perfected this recipe. The key is in the chopping of all of the ingredients. You want to finely mince everything. That and cooking the onions for a really long time. Oh, and also the reduction for hours at the end.

What you end up with is this ridiculous, rich, thick yum-of-a-sauce. Perfect for layering between slices of grilled polenta or tossing with some whole wheat rigatoni or served on top of some crusty crostini. You really cannot go wrong with this sugo.

But you've gotta have the time to make it . . .

Show-Someone-You- Love-Them Vegetable Sugo
serves 8-10
Cooking time: This dish takes hours and is great to make while you are either cooking other dishes.

Printable Recipe

4 cups onion, finely minced
1 � oz. dried porcini mushrooms
4 cups warm water
3 cup celery stalks, finely minced
3 cup carrots, finely minced
2 cups baby portabella mushrooms, finely minced
1 bulb garlic, peeled and squeezed with garlic press or minced
2 cups Italian parsley
� tsp. dried oregano
� tsp. dried thyme
� tsp. rosemary
1 cup dry red wine
30 oz tomato sauce
2 bay leaves
2 low sodium vegetable bouillon cubes (crumbed)
pepper to taste (or not)
In a soup pot, saut� onion over medium high heat for about 15 minutes. You can dry saut� at first. The onions should have enough moisture to keep them from sticking to the post. After the first 15 minutes, turn the heat to medium and continue to cook for another 30 minutes. At this point you can add stock as needed to keep onion from sticking to pot. The onions will be very soft and golden brown. This step is KEY. The onions need to cook for a good, long time.
Because the onions take a long time to cook down, this is a good time to prepare the other ingredients.
Soak dried mushrooms in 4 cups warm water.

After onions have cooked down, add celery and carrots to pot and cook 10 more minutes.

Bring heat back to medium high and add the portabella mushrooms, garlic, parley, oregano, thyme and rosemary. Stir and cook about 5 minutes.
Drain mushrooms, reserving liquid. (You can pour the liquid through a paper towel or coffee filter to remove any fine grit.)
Finely mince porcini mushrooms and add to pot.

Push all ingredients in the pot to the outside edge, leaving the center of the pot clear and open. Add the wine and cook wine down for about three minutes.

Next add the tomato sauce, reserved mushroom liquid, bay leaves and bouillon cubes.
Bring to a simmer. Reduce heat to low and cook for 1 � hours, stirring occasionally.

Remove cover and cook on medium until much of the liquid cooks off, leaving a rich, dark, thick sauce (about � hour).

Salt and pepper to taste.

This sauce is great served over baked polenta, pasta, gnocchi or ravioli.

What are you making this weekend?


Tuesday, July 12, 2011

Roasted Eggplant Pesto and Roasted String Beans

If you are growing basil in your garden, you are probably looking for sure fire recipes to use it in. Well, folks, this one from Susan over at Fat Free Vegan is certified outstanding!
Eat it as a dip or over some whole wheat pasta. You can't go wrong either way.
And in honor of my sister-in-law Lori's birthday, which is tomorrow, I present to you this: the Roasted Green Been. It's one of her favorites, I found out on my recent trip to New Jersey, and I had never made them before. They are quite good, although I couldn't ever give up my beloved Roasted Brussels Sprouts.

If you are participating in a CSA, you might be in need of something easy to do with string beans. Lord knows I received my share of string beans two summers ago!
 
Roasted String Beans

Preheat oven to 400�F. Wash, dry well, and trim green beans. Put green beans on a cookie sheet or jelly roll pan. Spray lightly with cooking spray. Sprinkle with salt and pepper to taste. Mrs. Dash may be substituted for salt and pepper as desired. Use your hands to be sure all the beans are evenly coated and spread them out into 1 layer.

Roast for 20-25 minutes, turning after 15 minutes, until beans are fairly brown in spots and somewhat shriveled. Serve hot or at room temperature.

Monday, June 27, 2011

Papaya and Basil Salad

Continuing with the theme of what we had for dinner on Friday night, here is the recipe for Papaya and Basil Salad. Sounds weird right? Well, I probably never would have given this recipe a second look if I had found it myself, but luckily for me, it was served to me two years ago by a friend and I immediately fell in love. Beth found the recipe in this cool New York Times article written by Mark Bittman called "Recipes for 101 Simple Salads for the Season" published in 2009. Check it out here if you want to see all of the recipes.

I have made it many, many times since. While it does have a lot of sugar, the vast majority of the dressing/marinade gets poured off before you serve the salad. What is left is a sweet and sour concoction that works well as a side dish or even on top of a green salad.

I happen to love papaya, so that may have something to do with my feelings for this salad. If you are not a papaya aficionado, I highly recommend asking your grocer to show you what a ripe papaya looks like (it's not pretty). Any papaya will ripen at home on your counter, which is a good thing and is more than can be said for many fruits that you get these days.

The papaya on the right is ripe, but my experience is that a ripe papaya can have lesions all over the skin that look very unappetizing. Don't be dismayed! The fruit on the inside is delicious!

Ripe papayas don't always look pretty.

You will want to cut the papaya in half length wise and scoop out all of the little black seeds.

Papaya and Basil Salad
inspired by a recipe by Mark Bittman
Serves 4-6 as a side dish

Printable Recipe

1 really ripe papaya, seeds and skin removed and cut into 1 1/2" chunks
1 or 2 large carrots, peeled and sliced
1/4 cup (a handful) fresh basil, sliced
1/2 cup rice wine vinegar
1/4 cup sugar (I used organic sucanat, which is dried cane juice and is much less processed than white sugar)
1 tsp salt

Combine vinegar, sugar and salt in a small sauce pan and bring to a simmer. Stir and remove from heat when sugar is dissolved. Let cool.

In a bowl, put papaya chunks, carrots and basil. Toss with vinegar marinade. Allow to marinate for 10 to 20 minutes and then strain off excess liquid before serving. Serve immediately.

If you would like to prep the marinade and the papaya, carrot, basil mixture ahead of time and keep them separate in the refrigerator, then toss right before serving, that would work well.

What is your experience with papaya? Love it or never had it?

Sunday, June 26, 2011

A Night of Firsts, Baked Eggplant Fries

Thank you for your comments and suggestions on my last post. I have a feeling that I am going to be referencing Helga (???) a lot here on HGK, so I've got to give her a name that really fits.

I think I was on our New Jersey road trip when I first laid eyes on Baked Eggplant Fries with Lemon Dill Dipping Sauce. It was one of those moments when I was like, "Oh My Gaaaaaaaaaa, I must remember to make these when I get the opportunity to and I really hope that this recipe doesn't fall into the deep recesses of my brain!" Luckily for everyone involved, the Baked Eggplant Fry image stuck with me, and Jennifer from Virtually Vegan Mama's creation was reborn in my kitchen (Lucy?).


My mother and father-in-law, Judy and Marv Solganik (and sis-in-law Janet on the left). It was Marv who just recently, at age 81, got in the wrong line at the Cleveland Marathon and ran the half-marathon instead of the 5K that he had signed up for. What an inspiration!
It was at my first Friday Night dinner with the new kitchen (Rosie?) that the Baked Eggplant Fries made an appearance, and boy did they create a food memory. They are lemony, crunchy and simply outstanding!

Here is the complete menu for the dinner:
Attias Family Baking Co. Whole Wheat Challah and Apple Cinnamon Challah
Chaya's Carrot Soup recipe here
Baked Eggplant Fries recipe here
Sweet Potato Enchiladas with Black Beans, Kale and Salsa Verde recipe here
Mexican Slaw? recipe here
Papaya and Basil Salad recipe here
Raw vegan Key Lime Pie from Organic Energy
Mama's Peas Vanilla Bean Mini Scones recipe here
Vanilla Soy Creamy Iced "Cream"


Here are my experiences and suggestions: I needed to double the amount of the herbed soy yogurt marinade and also increase the amount of whole wheat breadcrumbs by 50%  in order to make all of the eggplant into fries. Maybe my eggplants were larger than Jennifers?

I'm also not a huge fan of dill, and I used a variety of fresh herbs from my herb garden, which I am proud to say is doing wonderfully, given it's new location in my yard and all of the rain we have been having.

They are best eaten straight out of the oven, which is not so practical when you are serving a crowd at a sit down dinner. Perhaps they are best left to occasions when you are not having company or when you are serving guests in a really casual way, because you need to be "working" the fries and serving them as they come out of the oven in batches. But don't let that scare you, these are a must try!


Saturday, April 23, 2011

And They Said I Wouldn't Cook: Toaster Oven Socca

Thank you to everone who has already entered my blogger giveaway to win a copy of Chef A.j.'s book, Unprocessed. The responses are downright inspiring and it's not too late to enter if you haven't done so yet.

Prior to becoming a Nutritarian, a lot of people have legitimate concerns about whether or not this is a doable lifestyle for them. Unfortunately, as a society, we have become overly reliant on cheap, easy "food" that has little to no nutritional value. It's pretty obvious when considering this way of life that your habits in the kitchen department are going to have to change pretty entirely. Some people have even vocalized that they just don't know where to begin or even how to prepare healthy real food given their schedule and lifestyle. But I am here to say that you must make the choice. It's cook or get cooked, by disease that is. Either you take responsibility for your health or you don't. It's that simple.

Before I began kitchen renovations, my contractor, Dan Dureiko, said I wouldn't cook once our renovation was underway.

My friend, Brian Green, asked, "Do you know about the hidden cost of kitchen renovations?"

"No," I replied, shaking in my high healed, black suede, slouchy boots. This is already way over budget.

"Eating out in restaurants," he laughed.

"I'll show them all," I thought. Plus, there's pretty much no where to go out to eat when you are working hard to be an oil free, plant strong, Nutritarian Vegan.

My back's against the wall.

So I'm cooking, without a kitchen. A stew in my crock pot, quinoa salad in my rice cooker, I've even placed an order for a pressure cooker from amazon.com. I'm not letting a little thing like this

slow me down for a minute! If I can manage to get healthy real food on my table every day without a real kitchen, I won't accept any one's excuses!

This morning I was exploring the message boards on Dr. Fuhrman's Member Center for the first time ever, after participating in a webinar last last night where I learned how to navigate the monster, I came upon a thread about "Socca." It's a little like a bread, a little like a pancake. I've been seeing bloggers talk about it on and off for over a year now, so I was curious when I discovered that it was being referenced amongst Nutritarians. I quickly figured out that I could adapt it for my toaster oven so my 6 year old and I decided to go for it.

I'm pretty sure it was popularized by Michelle and Lori, the Pure2Raw twins over at http://www.pure2raw.com/. Here are two links that are worth exploring if you are so inclined:
All about Socca http://www.pure2raw.com/socca-tribute/
The Socca Videos http://www.pure2raw.com/2011/03/finally-our-first-socca-video/

Of course Maya wanted to start with their Chocolate Socca (sans the cardamom, she's just 6).

I decided to spray my pans with coconut oil spray instead of using the 3 Tbsp of coconut oil that The Twins call for. As you can see from the pictures below, it worked just beautifully without all of that oil.

I divided the batter into 2 9" round cake pans. Perfect size for my toaster oven! Here it is after baking for 20 minutes.

They popped out easily, just like the twins said they would!

Drizzled with maple syrup. My kids took one bite and they were done. I'm pretty sure they were expecting a sweet pancake, but they are more like a moist, dense bread and there is no sweetness except for the topping that you use. Next time I am going to try the straight up plain variety. Making the socca was so fast and easy with the detailed descriptions from The Twins, thanks Pure2Raw!

Have you ever made Socca? What were your results?